This guide was created by Facilities Reservations for use with https://schedule.salisbury.edu. This has been formatted for use with IT’s Quick Reference Guides. For updates, please contact Reservations at http://www.salisbury.edu/reserve/
Installing EMS
If you simply attempting to make a reservation you can do so by going to https://schedule.salisbury.edu. Installation is not required to create a reservation.
- In order to install EMS go to Software Center
- When using off campus you must be connected to Global Protect Always On VPN
- If you just installed EMS on your computer, when you click to start the program, it will ask you to fill out a database server and name.
- Database Server: db-ems.salisbury.edu,21802
- Database Name: EMS
- Your username and password will be provided by Facilities Reservations. If you do not have an account you will need to request one through Facilities Reservations to login.
Please log out of EMS if you are not using it. |
Making a Reservation
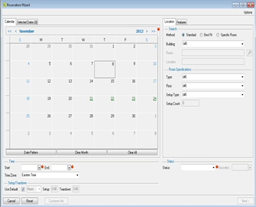
- Start by clicking on the “Wizard” picture icon at the top of the menu/tool screen. The Reservation Wizard window will open.

- Choose a single or multiple dates. Fill out your time, setup or teardown specifications, and status. For your room choices, I would keep your method as standard since you are limited to scheduling the spaces that are in your building only.
- You can also choose to do a date pattern for events that occur on a weekly or monthly basis.
- Above the calendar you will see a tab for “selected dates.” That will show you a list of all the dates you have selected. You can delete your selected dates here if you have holidays on your list you want to delete from your selection.
- Once you have finished filling out all the required information (any section with a red dot beside it), click next at the bottom of the screen.
- Select the location or locations you choose to schedule. Click next.

- Enter the rest of your event information in the screen shown in the picture to the right. At the bottom half of the screen you will see several tabs. On the default tab you will see a place to enter your “setup count.” Please never fill out “attendance” because in EMS this is the actual number of how many people came to the event and we do not intend on tracking that number.
- The last required field is under the “User Defined Fields” tab which is the last one. Choose the first option “Non-SU Attendees?”
- A dialog box will pop up and you will have to select yes or no. Click “ok” to close the dialog box. Then click finish.
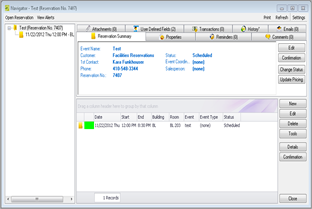
- This last screen will give you a summary of your reservation. On the left, you will see a list of the bookings under the reservation and you are able to expand each to see the booking details.

User's Manual

Related articles
Related articles appear here based on the labels you select. Click to edit the macro and add or change labels.


