Panopto is the campus support-supported lecture capture system. Faculty who wish to use Panopto must enable Panopto within MyClasses before recording. (Please refer to Enabling Panopto in Your MyClasses Course and Installing the Panopto Recorder for more information.)
Step-by-Step Guide
- Launch the Panopto Recorder on the computer that you will be capturing the screen/PowerPoint, video and/or audio (click on the Panopto icon on your desktop).
- When you launch the recorder for the first time, you will be prompted to login. If prompted, choose the option to login using external login provider and click the button to Sign in with MyClasses Canvas.
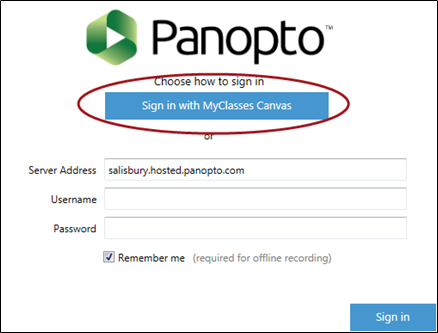
- The next screen will prompt you to login to MyClasses. Enter your SU username and password and click Login.
- The recorder will launch and you will need to decide what you will be recording for this presentation and where it will be published.
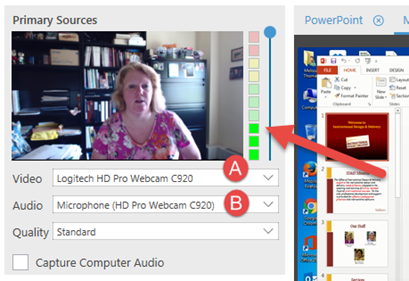
- On the left side of the recorder is an option to add video and audio. Use the drop down option to choose the Video Source you would like to record as the primary source (e.g. webcam). Once selected, you will see a live preview of the video that will show what will be recorded. If you do not want a video, leave this selection at none.

- Determine what Audio Source you would like to record for students to hear (i.e. microphone). You can test the audio by speaking into the microphone and see if the audio levels move indicating it is detecting sound.
- Right below Video and Audio is a section titled Secondary Sources which allows you to determine what on the computer screen you would like to include in the recording:
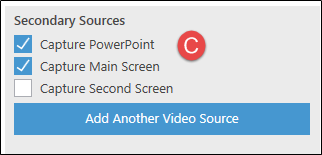
- Capture PowerPoint – for presentations using PowerPoint; enables a feature to index text in the presentation for students to search. It does NOT record mouse movements or external resources, such as playing videos embedded in the PowerPoint.
- Capture Primary Screen – for presentations using other resources, such as MyClasses, websites and other software beyond PowerPoint. OR if you would like to capture PowerPoint with external sources embedded, or if you would like to capture your mouse movements on the screen so it acts as a pointer.
Or select both to capture everything!
Note: Depending on your computer, additional sources might be available such as a second screen/monitor or a document camera.
- Select the dropdown icon on the right side of the screen to choose which folder (i.e. course name within MyClasses) in which you want to publish this recording.

- Name the session that you will be recording. We recommend giving it a unique name such as “Lecture on Derivatives” or in this example “Introduction to the Lightboard.”

Note: Descriptive recording names help to understand the contents of the recording, now and in the future.
- On the left side of the recorder is an option to add video and audio. Use the drop down option to choose the Video Source you would like to record as the primary source (e.g. webcam). Once selected, you will see a live preview of the video that will show what will be recorded. If you do not want a video, leave this selection at none.
Click the large red RECORD button to begin your recording. Once you are done, return to this screen and click either PAUSE (to pause the recording and have the ability to resume) or STOP (to end the recording).

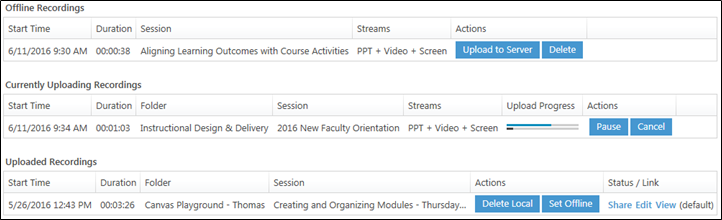
- Once everything has been recorded and you have stopped your recording, you will be prompted to Upload the recording to the server. You will then be taken to the recording status page which will show you the process of added the recording to the Panopto server:
*Important Note*
When recording, you will notice, whenever the recording is paused, that the recording timer will continue to run. Even while paused the stream will continue to be recorded. This feature is a safety net that keeps all footage of the stream while paused within the editing feature, in the case that the user fails to un-pause, to continue recording.


Offline Recordings are recordings that you have not yet picked a folder for, so they are just on your computer. To add an offline recording to the Panopto server, click Upload to Server.
Warning: If you delete an offline recording that has not be uploaded to the Panopto server, that recording will be lost.- Currently Uploading will show the video that you just completed and its status as it automatically adds to the Panopto server.
- Uploaded Recordings shows a list of all Panopto recordings created on that computer that you have already recorded, picked a folder for, and uploaded to the server. You may delete uploaded recordings from the local computer. This will not affect the recording on the Panopto server.
TIP: You must be connected to the internet in order to upload a recording, but you can record without an internet connection and upload it as soon as you connect back to the internet.
There is no content with the specified labels