
This covers sharing a calendar with another faculty or staff member, and how to open a calendar that was shared with you from the Outlook WebApp or the Outlook client.
To Share the Calendar:
Go to https://www.office.com/ and login with your SU email address and password
Select Outlook from the list of applications.
If you are sharing a calendar that belongs to a department email you must first open that mailbox.
Click on your initials or profile picture in the top right corner.
Select Open Another Mailbox
Enter the name of the Email address associated with the calendar and press OK.
Choose the Calendar(1) icon from the list of icons on the left.
On the top right select Share(2).
Enter the name or email address(3) of the SU user you would like to share your calendar with, then select the permission you would like to grant and click Share.
To remove permissions select the trashcan icon to the right of the user.
To Open a Shared Calendar:
Once a calendar is shared the recipient will receive an email stating they have been invited to view a shared calendar.
Click Accept and then View Calendar and the calendar will be added to your list of calendars.


To Share the Calendar:

4. Make sure the person’s name is selected, and change the Permission Level.
5. Click OK.
To Open a Shared Calendar:

The calendar will open and will now appear in your My Calendars list or your Shared Calendars list.
To Share the Calendar:
At the bottom of the navigation pane, select the Calendar icon.
![]()
Select the calendar you want to share.
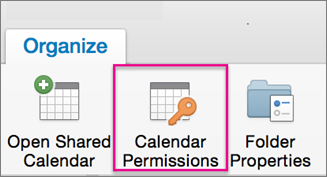
On the Organize tab, choose Calendar Permissions.
Note: If the Open Shared Calendar or Calendar Permissions buttons are unavailable, you might need to change one of your settings. See You cannot open a shared calendar in Outlook 2016 for Mac for instructions.
In the Calendar Properties box, choose Add User.
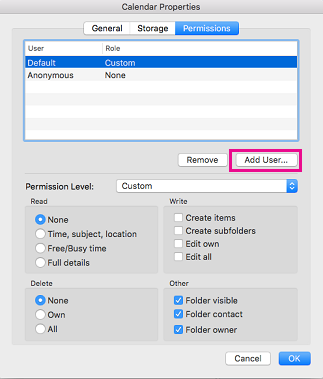
In the Search box, enter the name of the person you want to share your calendar with.
When you see their name appear in the list, select it and then choose Add.
In the Calendar Properties box, select the Permission Level down arrow, and choose the permission level to assign to the person you added. Note that the settings for Read, Write, Delete, and Other options change based on the permission level you choose.

Check the boxes that apply in the Read, Write, Delete, and Other sections, and then select OK.
To Open a Shared Calendar:

4. Select your SU email account from the list and click Advanced.

5. In the Advanced window select Delegates.
6. Under Open these additional mailboxes select the + button.
7. Enter the name of the shared mailbox and click Add.

8. Your shared mailbox will be listed under your personal mailbox in Outlook.
Related articles appear here based on the labels you select. Click to edit the macro and add or change labels.
|