This guide covers using Remote Desktop Connection to connect to your Windows-based SU computer from home.
Before using the remote desktop
In order to use Remote Desktop your SU device and home device must be Windows based devices connected via Ethernet.
*Mac devices are not supported for Remote Desktop at this time.
Request appropriate Permission
Faculty and staff must submit a ticket at Technology Support (http://support.salisbury.edu/user), select Logins, Accounts, and Access , and then select "I need to Remote to my Desktop PC".
Once the ticket has been completed your computer and account have been set up for Remote Desktop access.
Make a Note of your office PC Name
You will need to make note of the Computer Name of your office computer (that you will connect to).
- Start>Settings on your Windows 10 office computer.
- Click System and then choose About.
- You’ll find the Device Name (computer name) in the Computer name, domain and workgroup settings section of that screen.
- Write this down and bring it home with you. You’ll use this name to connect to your computer.
Starting a Remote Desktop Connection
Once home and ready to connect follow the below steps to initiate the connection from your personal windows based pc.
- Open Internet Explorer and go to https://vpn.salisbury.edu and sign in with your SU login and password. For more information about accessing the VPN, see Using VPN Access for Faculty and Staff
- Click the Windows icon at the bottom left corner of your screen. Under the Windows Accessories folder select Remote Desktop Connection
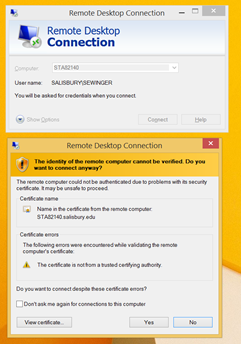
- Enter the full computer name of your work computer (e.g. AC100-S-99999.salisbury.edu) and then click Connect.
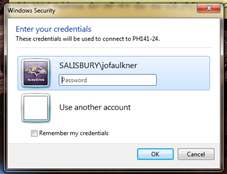
- After clicking Connect, you will be prompted for security credentials in the Window Security box. Type your SU username (if prompted) and your SU password then click OK.
- Note: If the credentials do not work, try “Use another account” and log in with your full SU email address and password.
- You may get a message that the identity of the remote computer cannot be verified. Check the box “Don’t ask me again for connections to this computer” and then click Yes.
- Once clicking OK, the Remote Desktop Session will start. Type your SU username and password at the login screen of the Remote Desktop session and click OK.
- Once the Remote Desktop session has started your PC screen will have the remote session of the PC you have remoted into as the remote computer name will be displayed at the top of the screen in a blue banner bar.
- Once finished with the Remote Desktop session, click the start button and logoff to end your remote session. This will place you back at your local home screen/PC.
Notes
- You cannot connect wirelessly while on campus. You must be on an off-campus connection to use Remote Desktop through wireless Internet.
- Staff members who are non-exempt must have permission from their supervisor.


